How to Organize Your Craft Supplies
Categorizing Your Craft Treasures: A System That Works

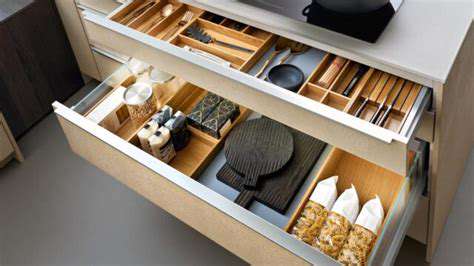
Organizing Your Collection
When you walk into a well-organized craft space, the difference is immediately noticeable. Not only does it look inviting, but everything has its place, making your creative process smoother. The secret lies in thoughtful categorization - this transforms chaos into order, letting you locate any item within seconds. Start by examining your materials and grouping them logically: by type (fabrics, beads, paints), by material (wood, metal, fabric), or by project use. This systematic approach turns your craft area into an efficient workshop rather than a frustrating maze.
Consider your workflow carefully. If you're constantly reaching for certain items, like beads for jewelry-making, position them front and center. This strategic placement eliminates wasted time searching and keeps your creative momentum going strong. You'll be amazed how much more you can accomplish when you're not constantly digging through disorganized supplies.
Materials Inventory
Every seasoned crafter knows the frustration of buying duplicate supplies because they forgot what they already owned. That's where a detailed inventory becomes invaluable. Maintaining accurate records of your materials - from fabric swatches to paint colors - gives you complete visibility of your resources. This isn't just about avoiding unnecessary purchases; it's about making informed decisions for future projects.
When you document your supplies, include specifics like quantity, color variations, and even where items are stored. This comprehensive approach means you'll never be caught short mid-project. Plus, when inspiration strikes, you'll know exactly what you have to work with, allowing you to dive straight into creating rather than scrambling to assess your supplies.
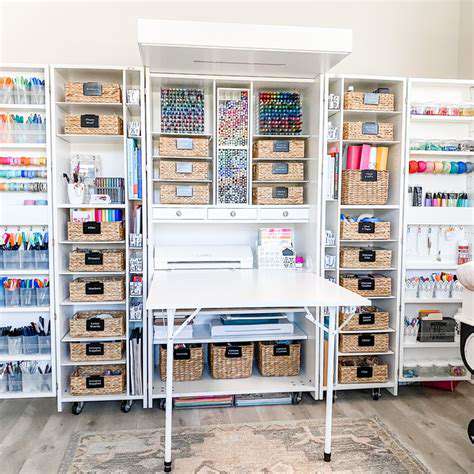
Project-Based Categorization
For crafters who juggle multiple types of projects, organization by category can be revolutionary. Imagine having clearly defined zones: one area for knitting with all yarns and needles together, another for scrapbooking with papers and adhesives at hand, and a painting station with easel and brushes ready. This method creates mini workshops within your space, each fully equipped for its specific purpose. The time saved from not having to gather scattered materials for each project quickly adds up to more productive crafting sessions.
Theme-Based Grouping
If your creative work follows particular themes - whether seasonal decorations, nature-inspired designs, or specific color palettes - grouping by theme can spark creativity. When all your autumn crafting supplies are together, from orange fabrics to leaf-shaped stencils, you can immediately immerse yourself in that aesthetic. This approach not only makes finding materials easier but also helps maintain a consistent style across projects. Your themed collections become visual inspiration boards that stimulate new ideas.
Seasonal or Event-Specific Storage
Holiday and seasonal crafts present unique organizational challenges. Dedicated storage for these special occasions means you're always prepared when the time comes, without cluttering your everyday workspace. Clear bins labeled Christmas or Halloween allow you to rotate decorations and materials as needed. This system keeps your main crafting area functional year-round while ensuring seasonal items are protected and ready when their moment arrives. The satisfaction of pulling out perfectly organized holiday supplies beats last-minute scrambling every time.
Streamlining Your Workflow: From Inspiration to Finished Project
Ideation and Brainstorming
The creative process often begins with a flood of possibilities that can feel overwhelming without structure. Effective brainstorming transforms this potential chaos into focused creativity. The key is creating an environment where all ideas are welcome initially, without immediate judgment or filtering. Try using large sheets of paper for mind mapping, or keep a dedicated idea journal. These visual representations help you see connections between concepts that might not be obvious at first glance.
As you capture ideas, look for patterns and relationships. What might seem like random thoughts often contain the seeds of your next great project. Later, you can refine these raw ideas into practical plans, but the initial phase should be about quantity, not quality. Some of the most innovative projects start as seemingly impractical notions that evolve through this process.
Defining Clear Goals and Objectives
Before making your first cut or brushstroke, clearly articulate what you want to achieve. A well-defined goal acts like a compass, keeping your project on course through all the creative decisions ahead. Ask yourself: Who is this for? What problem does it solve? How will I know it's successful? These questions force clarity and prevent wasted effort on misaligned work.
Consider writing your objectives down where you can see them while working. This constant visual reminder helps maintain focus when distractions or new ideas arise. Remember, goals can evolve, but having that initial target gives your creative energy direction rather than letting it scatter.
Planning and Scheduling
Even the most creative projects benefit from practical planning. Break your project into phases - design, material gathering, execution, finishing - and estimate time for each. This roadmap prevents the common pitfall of underestimating time requirements and ensures you have all necessary materials before starting. Use whatever tools work for you, whether digital apps or simple checklists, but make sure your plan accounts for each step.
Build in buffer time for unexpected challenges. If you finish early, that's bonus time for refinement. More often, those extra hours will save you from last-minute rushing. This structured approach might seem counterintuitive for creative work, but it actually provides the freedom to focus on the artistic aspects without logistical worries.
Execution and Implementation
This is where planning meets action. With your preparation complete, you can devote full attention to bringing your vision to life. Stay flexible during execution - sometimes the materials or process will suggest improvements to your original plan. Keep referring back to your goals to ensure these adaptations still serve the project's purpose.
Work in focused sessions with clear start and end points. Marathon crafting sessions often lead to fatigue-induced mistakes, while regular shorter sessions maintain quality and enthusiasm. If you hit obstacles, step back briefly to reassess rather than forcing forward - often the solution comes when you pause.
Monitoring and Evaluation
Periodically pause to assess your progress against your plan. These checkpoints catch small issues before they become major problems and confirm you're still aligned with your objectives. Ask yourself: Is the project developing as envisioned? Are there new considerations that require adjustment? This ongoing evaluation maintains quality control throughout the process.
Be honest in these assessments. If something isn't working, it's better to course-correct early than persist down an unproductive path. This doesn't mean abandoning ideas at the first challenge, but rather making informed decisions about when to pivot versus when to push through.
Review and Refinement
When the last bead is strung or the final brushstroke applied, take time to reflect on the entire process. This post-project analysis is where lasting improvements to your workflow happen. What techniques worked brilliantly? Where did you encounter unnecessary difficulties? Document these observations for future reference - they're gold for continuous improvement.
Consider keeping a craft journal noting these insights while they're fresh. Over time, you'll identify patterns - perhaps you consistently underestimate material needs, or certain organizational methods prove particularly effective. This knowledge transforms each project into a learning experience that makes the next one even more successful.
Read more about How to Organize Your Craft Supplies